Outline
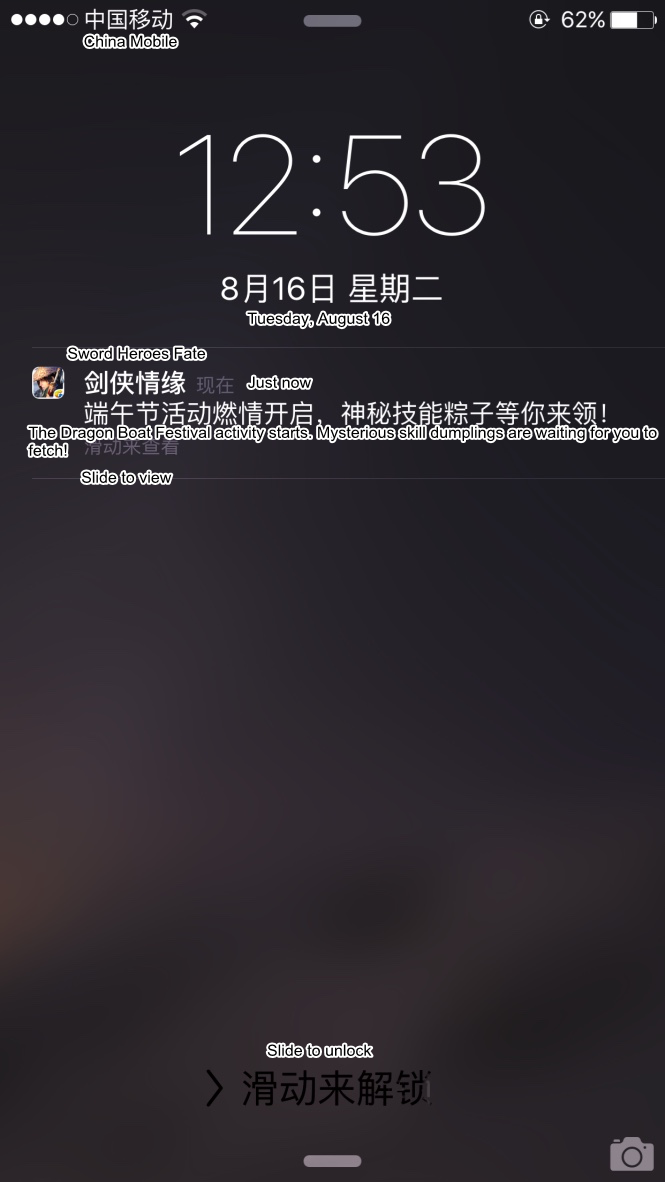
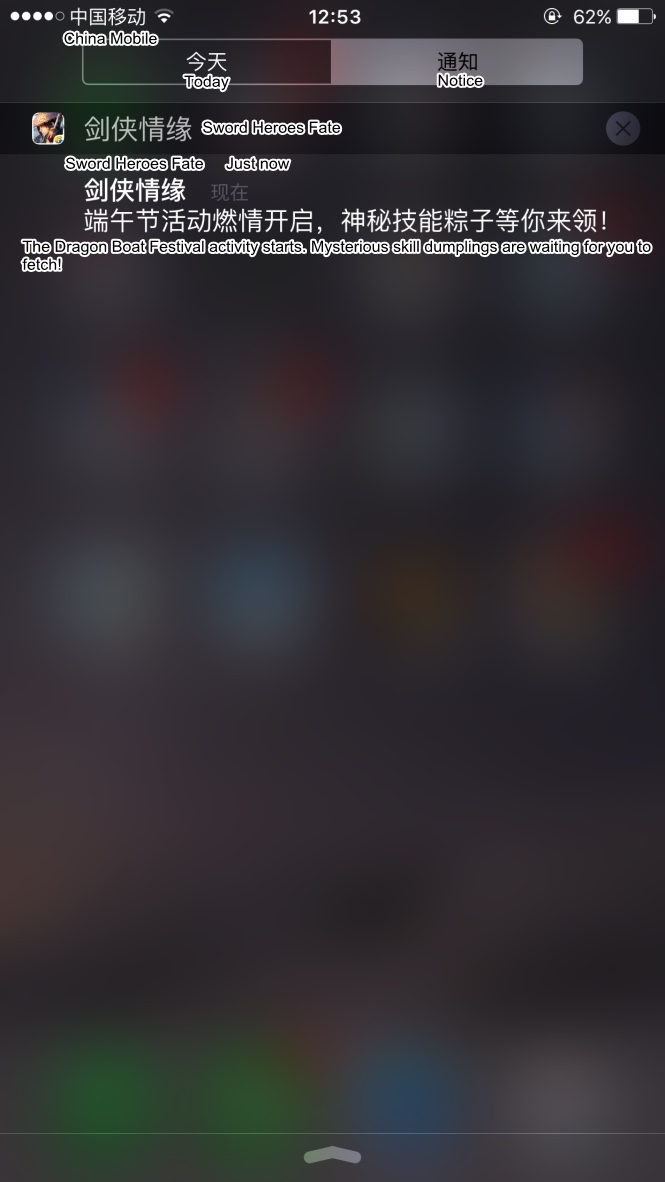
The push function can push game-related information to the player's phone in case that the game is not running, such as a variety of holiday activities, anniversary activities. The push effect is shown in the following diagram:
Access Guide
Step1 Preconditions
1) You have configured push switch in info.plist, as shown in the figure below:
![]()
2) Businesses which use Xcode8 for compilation need to open the project's TARGETS->Capabilities->Push Notificatons push switch, as shown in the figure below:

3) MSDK iOS push is realized through Apple Push Notification Service(APNS). The PM of every business or Tencent contact person need to configure relevant certificatesConfigure relevant certificates in Tencent’s internal networkRDM orThe Flying Eagle System.
Step2 iOS configuration certificate
Configuration certificates are only tailored to iOS terminal and can be neglected at the Android terminal.
1 Apply for a certificate
Products need to apply for push and release certificates at RDM(Tencent’s internal network; applied for by business PM or Tencent contact person). For details, consult RDM Helper via RTX.
2 Make SSL Certificate
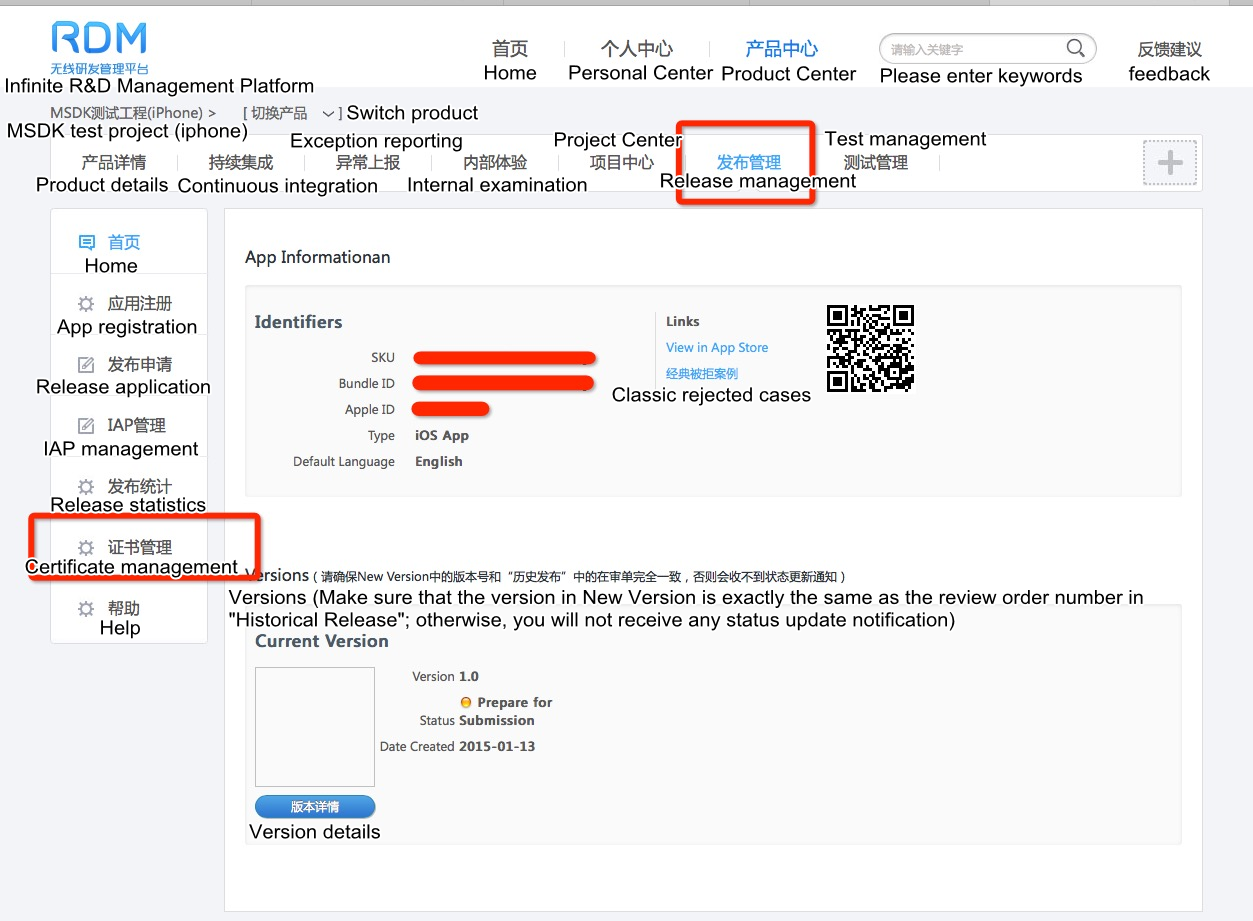
1)Download P12 certificate from RDM(Tencent’s internal network; applied for by business PM or Tencent contact person). The specific path is: Game product ->Release management -> Certificate management. Take MSDK as an example, as shown in the figure below:
2)Download xxx_push.p12 file under the release certificate from the opened UI
3)Open the terminal and enter the directory where xxx_push.p12 file is located to execute the following command:
//pem certificate generated by this command has no password. When the certificate is uploaded to the Flying Eagle System (http://dev.ied.com), there is no need to fill in the password, but note to distinguish it from p12 certificate password.
openssl pkcs12 -in xxx_push.p12 -out xxx_push.pem -nodes
3 Upload SSL Certificate
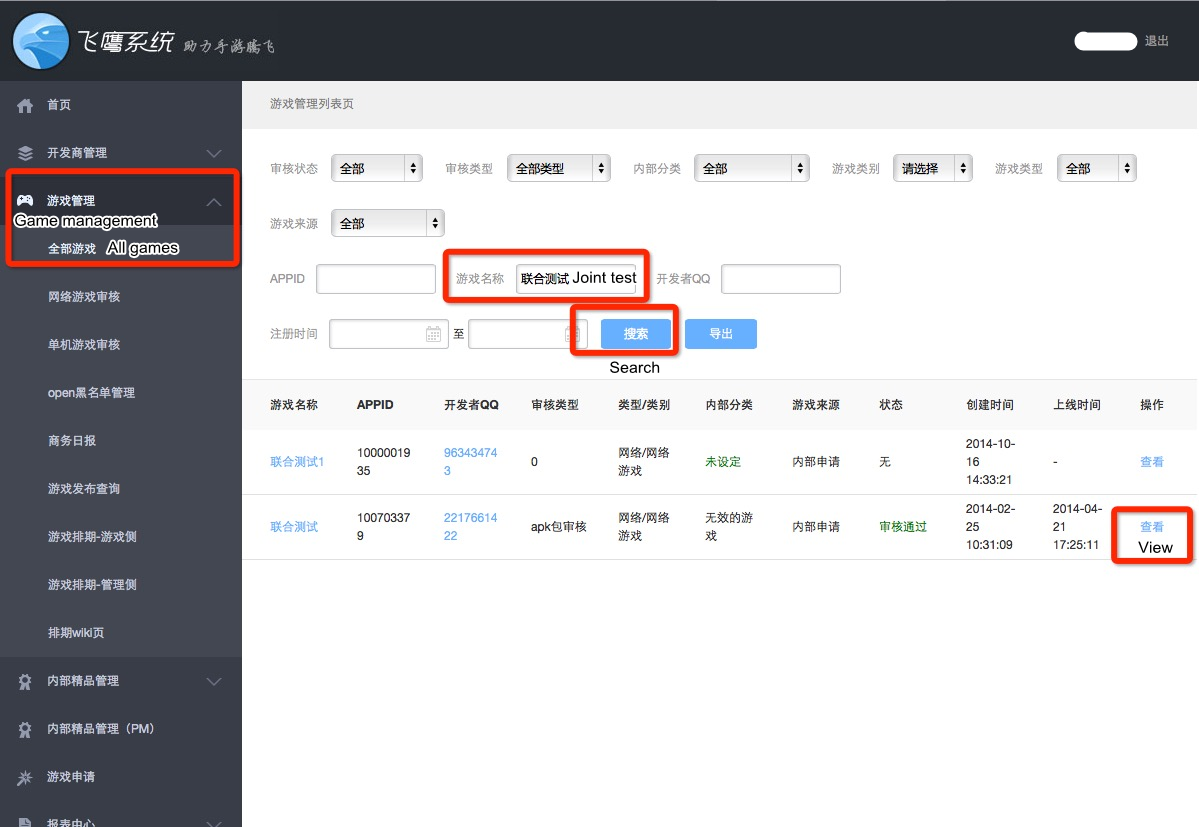
1) Enter the Flying Eagle System (Tencent’s internal network; operated by business PM or Tencent contact person), and click “MSDK management ->Message management-> Certificate configuration” on the left navigation bar (contact marsrabelma (Ma Teng) through RTX to open the permissions if you have no relevant permissions), and query your own game. Here, take MSDK as an example, as shown in the figure below:
2) Select the game and enter the certificate configuration page , as shown in the figure below:
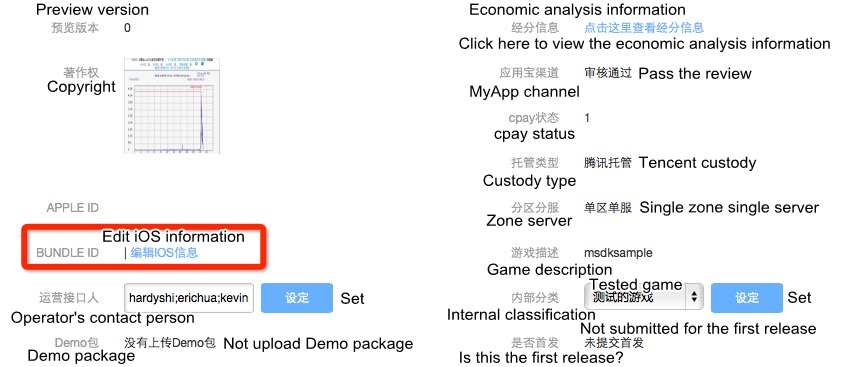
3) Upload pem certificate generated in Step 2 Make SSL certificate to the production environment. There is no need to fill the password. After uploading it successfully, click the Update game IOS info button at the top left corner to save it. Just ignore the development environment certificate. At this moment, the certificate has been configured.
Step3 Add relevant push codes
Choose OC interface or C++ interface to use
1 the following interface is OC interface
You still need to add five methods in relation to push in AppDelegate.mm:
1) Register push
Only when the signature file is correctly configured can push be successfully registered. In didFinishLaunchingWithOptions method, call MSDK’s WGRegisterAPNSPushNotification method to register push. The demo code is as follows:
- (BOOL)application:(UIApplication *)application didFinishLaunchingWithOptions:(NSDictionary *)launchOptions
{
    …
    [MSDKXG WGRegisterAPNSPushNotification:launchOptions];
    …
}
2) Registration succeeds
After the registration succeeds, the game will receive didRegisterForRemoteNotificationsWithDeviceToken callback method. The game needs to call WGSuccessedRegisterdAPNSWithToken method in the method to report deviceToken to MSDK. Demo code:
-(void)application:(UIApplication *)application didRegisterForRemoteNotificationsWithDeviceToken:(NSData *)deviceToken
{
  [MSDKXG WGSuccessedRegisterdAPNSWithToken:deviceToken];
}
3) Registration fails
After the registration fails, the game will receive didFailToRegisterForRemoteNotificationsWithError method callback. At this time, the game needs to call WGFailedRegisteredAPNS method to inform MSDK of the failed push registration. Demo code:
-(void)application:(UIApplication *)application didFailToRegisterForRemoteNotificationsWithError:(NSError *)error
{
  [MSDKXG WGFailedRegisteredAPNS];
}
4) Receive messages
After push is successfully registered, app will receive the push message and then enter didReceiveRemoteNotification method. After that, the game needs to call WGReceivedMSGFromAPNSWithDict method in the method to push the message to MSDK to parse it. The parsing result will be notified to the game. Demo code:
-(void)application:(UIApplication *)application didReceiveRemoteNotification:(NSDictionary *)userInfo
{
  [MSDKXG WGReceivedMSGFromAPNSWithDict:userInfo];
}
5) Clear badge
App needs to clear the push item at the top right corner of the desktop icon of the app through calling WGCleanBadgeNumber method in applicationDidBecomeActive. Demo code:
-(void)applicationDidBecomeActive:(UIApplication *)application
{
  [MSDKXG WGCleanBadgeNumber];
}
2 the following interface is C++ interface
You still need to add five methods in relation to push in AppDelegate.mm:
1) Register push
- Functional description
Registration message push,Only when the signature file is correctly configured can push be successfully registered. In didFinishLaunchingWithOptions method, call MSDK’s WGRegisterAPNSPushNotification method to register push.
- Interface declaration
void WGRegisterAPNSPushNotification(unsigned char *launchOptions);- Parameter Description
| Parameter Name | Type | Description |
|---|---|---|
| launchOptions | unsigned char* | (NSDictionary *)launchOptions parameter in "-application:didFinishLaunchingWithOptions:" is converted to json string |
2) Registration succeeds
- Functional description
After the registration succeeds, the game will receive didRegisterForRemoteNotificationsWithDeviceToken callback method. The game needs to call WGSuccessedRegisterdAPNSWithToken method in the method to report deviceToken to MSDK.
- Interface declaration
void WGSuccessedRegisterdAPNSWithToken(unsigned char *deviceToken);- Parameter Description
| Parameter Name | Type | Description |
|---|---|---|
| deviceToken | unsigned char* | (NSData *)deviceToken parameter in "-application:didRegisterForRemoteNotificationsWithDeviceToken:" is converted to a string |
3) Registration fails
- Functional description
After the registration fails, the game will receive didFailToRegisterForRemoteNotificationsWithError method callback. At this time, the game needs to call WGFailedRegisteredAPNS method to inform MSDK of the failed push registration.
- Interface declaration
void WGFailedRegisteredAPNS();- Parameter Description
None
4) Receive messages
- Functional description
After push is successfully registered, app will receive the push message and then enter didReceiveRemoteNotification method. After that, the game needs to call WGReceivedMSGFromAPNSWithDict method in the method to push the message to MSDK to parse it. The parsing result will be notified to the game.
- Interface declaratio
void WGReceivedMSGFromAPNS(unsigned char *userInfo);- Parameter Description
| Parameter Name | Type | Description |
|---|---|---|
| userInfo | unsigned char* | (NSDictionary *)userInfo parameter in "-application:didReceiveRemoteNotification:" is converted to json string |
5) Clear badge
- Functional description
App needs to clear the push item at the top right corner of the desktop icon of the app through calling WGCleanBadgeNumber method in applicationDidBecomeActive.
- Interface declaratio
void WGCleanBadgeNumber();- Parameter Description
None
Tencent Mobile Push TPNS
TPNS is the charged version. If you want to access it, you need to apply for the accessId and accessKey again. MSDKV3 client has started to integrate TPNS since Version 3.3.12. Currently, TPNS supports pluginized access.
1 Apply accessId and accessKey
accessId and accessKey can be directly applied for at Feiying System (Intranet access). Please contact MSDK Assistant to assist in registration
If the game has already registered a Tencent Cloud account in the Tencent Cloud console and already has a Cloud XG account, it can also be migrated to Feiying System. You need to contact MSDK Assistant to assist in migration
- To register and apply in the Feiying system or to migrate to the Feiying system, you need to provide UIN (you can log into the Tencent Cloud's official website to view the UIN: https://console.cloud.tencent.com/developer
- Internal users of the company can use Tencent Cloud's internal account to purchase it. As for the company's internal account query method and application method, please see https://docs.qq.com/doc/DVWZBYkJ2SHBaUE9y
2 Client access instructions
The TPNS data reporting capability is the reflection call on the TPNS side, so every game needs to add its own dependency on TPNS. To access TPNS capability, in addition to adding 'MSDKPush/MSDKPush.framework', a game also needs to add the TPNS library and header files in the MSDKPush/XG directory.
2.1 Add configuration in info.plist
TPNS version requires configuring accessId and accessKey information. Please configure iOS TPNS accessId and accessKey in info.plist, where accessId is the Number type and accessKey is the string type. The configuration example is as follows:
    <key>XG_V2_ACCESS_ID</key>
    <integer>xxx</integer>
    <key>XG_V2_ACCESS_KEY</key>
    <string>xxx</string>
If the access point is the Shanghai cluster, the following configuration needs to be processed
In the info.plist file of the project, add
<!-- 3.3.16 version's configuration -->
<key>XG_HOST</key>
<string>https://api.tpns.sh.tencent.com</string>
<key>XG_PORT</key>
<integer>0</integer>
<key>XG_STAT_HOST</key>
<string>https://stat.tpns.sh.tencent.com</string>
<key>XG_STAT_PORT</key>
<integer>0</integer>

<!-- 3.3.17 and later versions' configuration -->
<key>XG_HOST</key>
<string>tpns.sh.tencent.com</string>XG_HOSTandXG_STAT_HOSTneed to carry https header- 3.3.16 version
XG_HOSTneeds to be modified tohttps://api.tpns.sh.tencent.com - Starting from version 3.3.17, it is needed to delete
XG_PORT,XG_STAT_HOST,XG_STAT_PORTconfigurations, and modifyXG_HOSTtotpns.sh.tencent.com(Note: no https header is required)
2.2 Log off XG free version
If you do not log off the free version, the same user may receive two identical messages during the upgrade and coverage process of App. The way to log off it is to configure the accessId of the XG free version in info.plist. Please add XG_FREE_ACCESS_ID in info.plist, whose type is Number. The example for the corresponding Key and configuration is as follows:
    <key>XG_FREE_ACCESS_ID</key>
    <integer>xxx</integer>
Among them, XG_FREE_ACCESS_ID is filled in with 'accessId' of the free version of XG before upgrade. If you don't know this, you can query it at Feiying system's SDK parameters section.
2.3 Delete TPNS version
If you do not access TPNS version, you need to modify and delete the following content, as follows:
- Set MSDK_PUSH_SWITCH to false in info.plist
- Delete the TPNS configuration in 2.1 and 2.2
- Delete MSDKPush.framwork
Warning
- If you want the game to be still able to receive pushes at the front-end, you need to configure
MSDK_PUSH_AT_FOREGROUNDto true in the info.plist file. The configuration is disabled by default.
3 Console configuration instructions
3.1 Create products and apps
Create products and apps. For details, refer to Tencent Mobile Push - Create Product and Application Documentation
3.2 Apply for trial
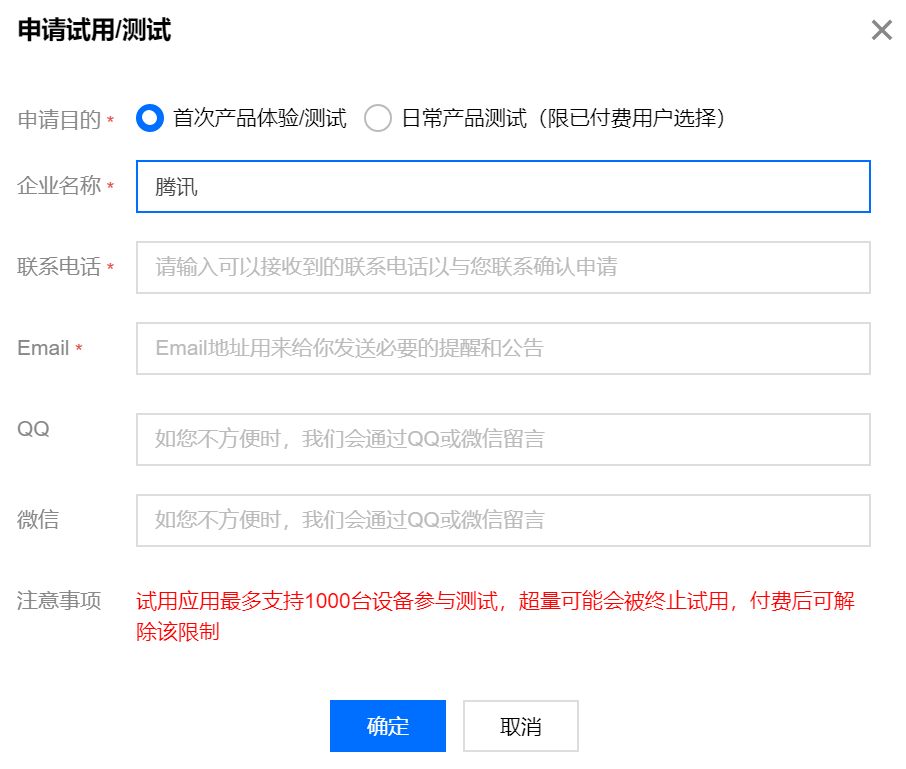
Click [Apply for Trial/Test] on the page, fill in "Tencent" for the company name, and enter the phone number and email address according to the information filled in by the applicant. After application, you can contact MSDK Assistant for specific usage methods
3.3 iOS certificate configuration
As for the certificate configuration method, please refer to Tencent Mobile Push - Upload Push Certificate Method Documentation
3.4 Create a push task and a push test method
Create a push task and a push test method. For details, please refer to Tencent Mobile Push-Create Push Task and Push Test Method Documentation
4 TPNS's service payment instructions
TPNS's service payment instructions. For details, please refer to Payment Instructions Documentation
Contact person: Cloud IT support
5 iOS notification service extension configuration (required for the statistics of arrivals)
MSDK only carries the TPNS extension library, which requires game integration access. For specific access, please refer to the TPNS guide document:Instructions for using the notification service extension
Contact person: Cloud IT support
MSDK V3.3.15 and later versions add the following interface
1 Account binding
1) Function description
Developers can bind user-defined accounts for different users, and then push the accounts. The accounts cannot be empty. A single app can have up to 10,000 user-defined tags/accounts, and each device token can be bound to up to 100 user-defined tags/accounts.
- The account here can be any type of business accounts such as a mailbox, QQ number, mobile phone number, user name, etc.
- When multiple devices are bound to the same account, the backend will push the message to the last bound device by default
2) Interface declaration
The declaration and related parameter descriptions can be viewed in the WGPlatform.h file
void WGSetPushAccount(unsigned char *account);3) Parameter description
| Parameter name | Type | Description |
|---|---|---|
| account | unsigned char * | Account |
4) Demo code
WGPlatform::GetInstance()->WGSetPushAccount("account");2 Unbind account
1) Function description
Unbind the bound user-defined account, which cannot be empty.
- Account unbinding is just to disassociate Token from the App account. If you use the full amount/tag/Token push, you can still receive notifications/messages
2) Interface declaration
The declaration and related parameter descriptions can be viewed in the WGPlatform.h file
void WGDeletePushAccount(unsigned char *account);3) Parameter description
| Parameter name | Type | Description |
|---|---|---|
| account | unsigned char * | Account |
4) Demo code
WGPlatform::GetInstance()->WGDeletePushAccount("account");3 De-registration
1) Function description
When the user has logged out or App is closed and no longer needs to receive push notifications, you can cancel the registration of the App, that is, de-registration. (Once the device is de-registered, the device will not be able to receive the sent message until the device re-registers successfully).
- Do not make de-registration too frequently, because this may cause the backend synchronization delay
- There is no need to de-register in case of account switch. The last registration will automatically prevail in case of multiple registrations
2) Interface declaration
The declaration and related parameter descriptions can be viewed in the WGPlatform.h file
void WGUnregisterPush();3) Parameter description
None
4) Demo code
WGPlatform::GetInstance()->WGUnregisterPush();Send push message
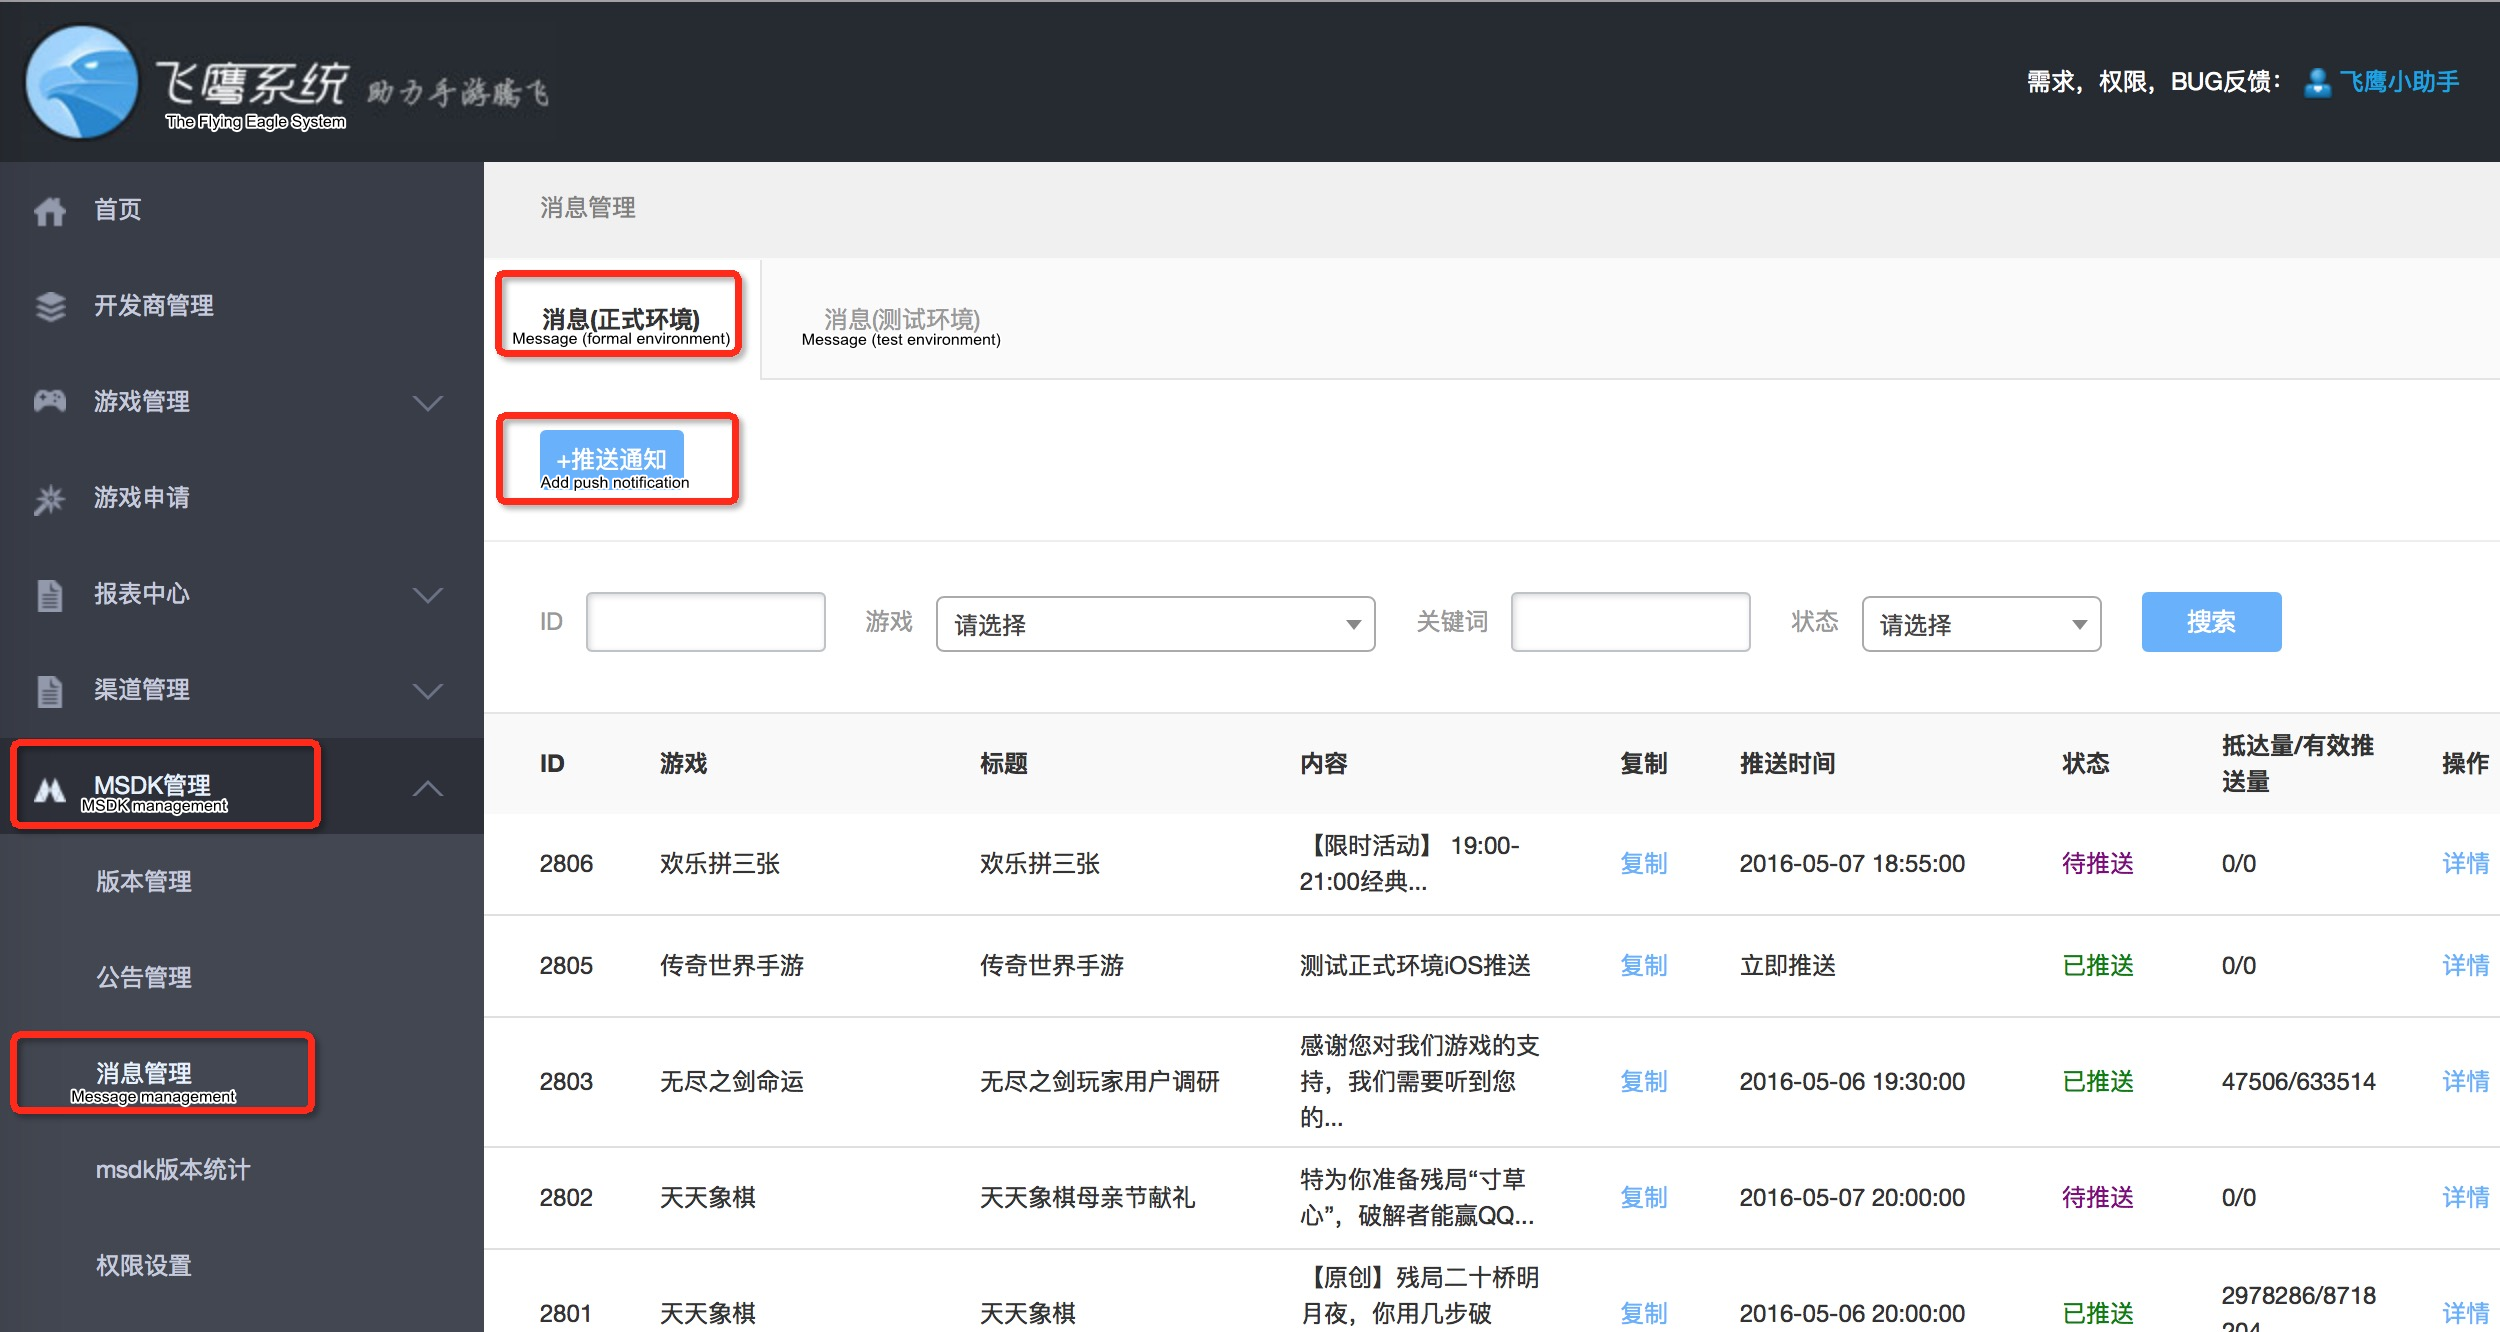
Enter The Flying Eagle System. On the left navigation bar, click MSDK management -> message management (those having no permissions can use RTX to contact marsrabelma (Ma Teng) to open permissions). And in the open UI, click Message (Formal Environment) button, and click + Push Notice button in the formal environment to add the push message, as shown in the following diagram:
Note:
- When testing push messages, do not push their full amount. You can use a single account or batch accounts to test them to avoid the whole network users from receiving the test push message.
Add local push
In addition to remote push, the game can also push local messages, such as physical recovery reminder.
3 Clear ineffective local push
1 iOS local push
- Function descriptione
Local push is message notification which can be completed in the local. Unlike remote push, it doesn't need to interact with the remote server. It is mainly used in physical recovery reminders and other scenes.
- Interface declaration
long WGAddLocalNotification(LocalMessage &localMessage);- Parameter description
| Parameter name | Type | Description |
|---|---|---|
| localMessage | LocalMessage class | skip to view it |
- Return value
1 Add successfully, 0 Add unsuccessfully
- Demo code
//If current time is "2015-09-17 17:00:00", push will commence 10 seconds later
LocalMessage message;
message.fireDate = "2015-09-17 17:00:10";
message.alertBody = "Local Notification";
message.badge = 1;
message.alertAction = "Start";
KVPair item;
item.key = "key";
item.value = "vlaue";
std::vector<KVPair> userInfo;
userInfo.push_back(item);
message.userInfo = userInfo;
WGPlatform::GetInstance()->WGAddLocalNotification(message);- Special description
1) This interface will not receive the local push until the game is returned to the backend or the process is killed.
2) When the user clicks the local push, this will launch the game. If the game needs to adopt different handling strategies according to different pushes, it shall implement the following proxy method in AppController(UnityAppController):
- (void)application:(UIApplication *)application didReceiveLocalNotification:(UILocalNotification *)notification
{
    // Handle a push message
    NSLog(@"Receive a local push message:%@ %@",notification.alertBody,notification.userInfo);
    LocalMessage message;
    message.alertBody = [notification.alertBody cStringUsingEncoding:NSUTF8StringEncoding];
    std::vector<KVPair> userInfo;
    for (NSString *key in notification.userInfo.allKeys)
    {
        NSString *value = notification.userInfo[key];
        KVPair item;
        item.key = [key cStringUsingEncoding:NSUTF8StringEncoding];
        item.value = [value cStringUsingEncoding:NSUTF8StringEncoding];
        userInfo.push_back(item);
    }
    message.userInfo = userInfo;
    //The game can take different strategies according to this message.
}- Term interpretation
None
2 Add local frontend push
- Function descriptione
By default, the local push will not pop up a window when the game is running at the frontend. The designated push pop-up window can be realized through WGAddLocalNotificationAtFront interface.
- Interface declaration
long WGAddLocalNotificationAtFront(LocalMessage &localMessage);- Parameter description
| Parameter name | Type | Description |
|---|---|---|
| localMessage | LocalMessage class | skip to view it |
- Demo code
LocalMessage message;
message.alertBody = "Local Notification At Front";
message.userInfoKey = "FrontKey";
message.userInfoValue = "FrontValue";
WGPlatform::GetInstance()->WGAddLocalNotificationAtFront(message);- Special description
The interface has no need to set the push time. After it is called, the interface will be immediately displayed and is irrevocable.
- Term interpretation
None
3 Clear ineffective local push
- Function descriptione
Ineffective local push can be cleared through calling WGClearLocalNotification interface.
- Interface declaration
void WGClearLocalNotification(LocalMessage &localMessage);- Parameter description
| Parameter name | Type | Description |
|---|---|---|
| localMessage | LocalMessage class | skip to view it |
- Demo code
LocalMessage message;
//Note: userInfoKey and userInfoValue here shall keep consistent before and after the push is added; otherwise, they are irrevocable
message.userInfoKey = "key";
message.userInfoValue = "value";
WGPlatform::GetInstance()->WGClearLocalNotification(message);- Special description
None
- Term interpretation
None
4 Clear all local pushes
- Function descriptione
All local pushes can be cleared through calling WGClearLocalNotifications interface.
- Interface declaration
void WGClearLocalNotifications();- Parameter description
None
- Demo code
WGPlatform::GetInstance()->WGClearLocalNotifications();- Special description
None
- Term interpretation
None
Tag push
The game can set tags for the user, such as gender, age, education, hobby, etc.; in addition, some default tags are preset in SDK. When pushing messages, you can push targeted messages based on different tags.
4 send the tagged push message
1 preset tag
Pigeon now offers the following three types of preset tags, and the game doesn't need to set additional tags:
Geographic location(provincial level)
App version
Lost user(3 days or 7 days)
2 set tag
- Function descriptione
The game can set tags for different users. A game can set a total of up to 10,000 tags. Each user can set up to 100 tags in a game. When setting a tag, note that the tag can not contain any space.
- Interface declaration
void WGSetPushTag(unsigned char* tag);- Parameter description
| Parameter name | Type | Description |
|---|---|---|
| tag | unsigned char* | it is not allowed to be null or contain any space |
- Return value
None
- Demo code:
WGPlatform::GetInstance()->WGSetPushTag((unsigned char*)"Student");- Special description
None
- Term interpretation
None
3 delete tag
- Function descriptione
Delete the set user tag. When you push a message, the user will not be able to receive the push message under the tag.
- Interface declaration
void WGDeletePushTag(unsigned char* tag);- Parameter description
| Parameter name | Type | Description |
|---|---|---|
| tag | unsigned char* | it is not allowed to be null or contain any space |
- Return value
None
- Demo code
WGPlatform::GetInstance()->WGDeletePushTag((unsigned char*)"Student");- Special description
None
- Term interpretation
None
4 Send the tagged push message
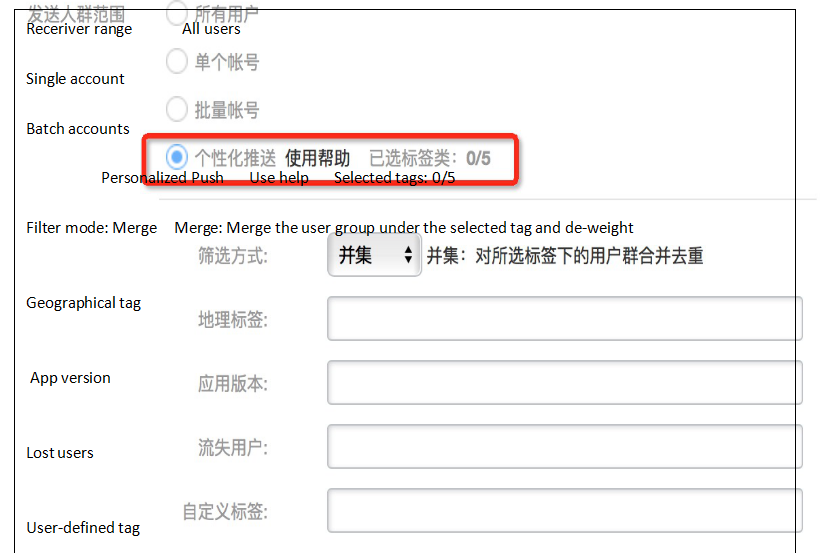
Sending the tagged push message is the same with Send push message. It only needs to choose personalized push for the covered crowd range when adding the push message, as shown in the following diagram:
Callback for clicking the push message
1)Function description
iOS TPNS push clicking callback, that is, `OnReceiveNotificationResponseNotify`, is provided. The converted json string of the `userInfo` field can be obtained through the callback. 3.3.26 version starts adding this interface
2)Demo code
//Set callback
MyObserver* ob = MyObserver::GetInstance();
WGPlatform::GetInstance()->WGSetObserver(ob);

//Callback example
void MyObserver::OnReceiveNotificationResponseNotify(const char *userInfo)
{
	...
}
